Saturday, December 12, 2015

Snowflakes and Stars christmas ornaments


snowflakes, stars and more stars.  All of these that have been fired have been done so at tack fuse level.  Now I am full fusing them to see which way I like it better.  The full fuse schedule came from Deans Blog who also had a pattern for a snowflake with 1/4 inch strips of glass delicately place all around.  This is how he says he fired it.:

500 dph.............................300 degrees....................................hold 5 mins
800 dph.............................1465 degrees..................................hold 5 mins
Full.......................................900 degrees.................................hold 30 mins
175 dph.................................800 degrees.................................hold 10 mins

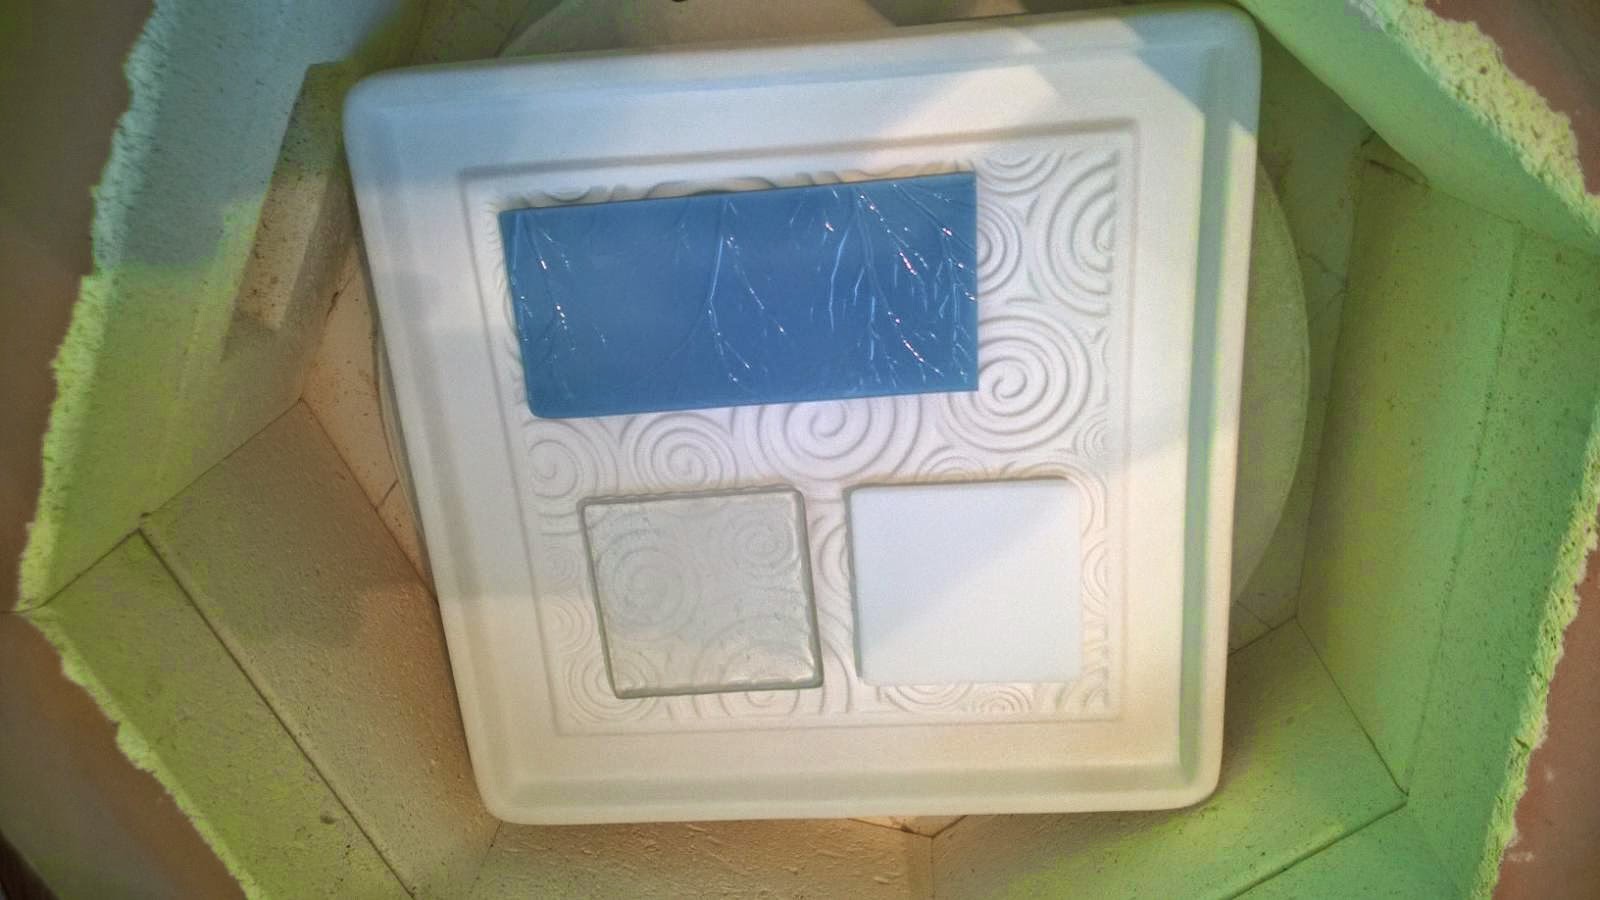
Right now the most important thing is to see which looks better the tack fused or the full fused or whether I should have both.  I also have come up with an idea to use the 1/4 inch strips and place the 1" colored squares on them to decorate them in a star. snowflake like pattern  So right now I am full fusing this one and we shall see.

The tack fuse schedule that I used is as follows:

400 dph..................................1000 degrees........................hold 10 mins
600 dph...................................1360 degrees.......................hold 10 mins
Full ...........................................900 degrees.......................hold 30 mins
100 dph.....................................700 degrees........................off

So it is better to pick a firing schedule some where in between tack and full fuse


This tack fuse schedule hardly does anything.  The sides do not pucker but the different pieces do stick to each other.  I think if I determine that I still like the tack fuse best then I should make it fire higher and longer to get it to have some additional effects.

The full fuse looked awful.  Perhaps because of the kind of glass that I used or even the placement of the glass but tack fused it looks better.  this time I had two projects prepared, one a snowflake that needs full fusing and the other the star that I believe looks better tack fused.  Before thinking I put both of them in there together and did not want to remove one, so decided to use a processing temperature that might be a good compromise between the two.  So I am firing it to 1410 and holding only 5 minutes.  Lets see if that lower temperature does not harm the full fusing of the snowflake and does not affect the good look of the tack fused star. I finally tried a little more heat and I liked the effect there.  In this project I am alligning the points of the squares to the post to which they are attached instead of aligning them up and down and am firing them with the following schedule.  I used this previously and I like how it came out but in this trial I am going to use the 1420 degrees as the processing temperature but I am only going to hold it for 5 minutes.  It will go as follows:

400 dph....................1000 degrees.....................................hold 10 mins
600 dph.....................1420 degrees....................................hold 5 mins
Full.............................900 degrees.....................................hold 30 mins
100 dph.......................700 degrees..........................................off


so that, above, is the best firing schedu

Thursday, November 19, 2015

Christmas stocking

300 dph............................1250 degrees.....................hold 10 mins
Full...................................1420 degrees.....................hold 10 mins
Full....................................900 degrees......................hold 30-60 mins
60 dph................................700 degrees...........................off

Sunday, November 1, 2015

KILN CARVING

I cannot add a picture of bullseye glass striker 1120-0030.  It turns into a pretty yellow when fired.  But I tried to make sure it is not part of a series of glass that 

"This style is not suitable for kilncasting because it can opalize and/or become incompatible when held at high temperatures for an extended period. It may also opalize and/or become incompatible in instances where processes exceed the parameters of the test for compatibility. Testing recommended when heatwork exceeds these parameters.has gold in it and thus needs a 2 hour hold  when processing."


So at further thought I am not going to use this glass for my kiln carving project.  I am going to wait to buy a light transparent glass from Stained Glass Express on Thursday.   I am also going to buy some additional fiber paper.
Did my kiln carving pick up the marks I had drawn on the fiber paper, marks of veins in leaves; ever so slightly.  I guess it will need a second layers of fiber paper.  So may be I should try that: a big leaf, one cut out covered with a second cut out of veins and on a stem.  And perhaps it would improve in glass other than white.  Perhaps I will put this on a piece of green transparent glass.  But first I cut out circles and within those cut out circles I have placed another circle.  Want to see negative and positive and its effects on glass through kiln carving. 


Positive and negative.  The one on bottom is two circles cut out, with a smaller circle in center; the one above is 2 layers of two circles.  One is 1/8th inch and the other is 1/16th inch.


Tuesday, September 15, 2015

Glass Used

Examples of different glass used

Bullseye

Bullseye


1025-0030Bullseye glass 1025-0030, light orange striker transparent glass

Thursday, September 10, 2015

Petal Mold

I slumped the Petal dish mold with the following schedule :

300 dph................................................1200 degrees....................hold 30 mins
300 dph.................................................1225 degrees...................hold 1 1/2 hours
Full........................................................ 900 degrees....................hold 1 hour
100 dph...................................................700 degrees.......................off

Monday, August 10, 2015

SCALLOP SLUMP MOLD


I love how this came out, and will do another.  This time instead of fusing the panel first and then full fusing it I am going to fire it all at one time.  Using 2 circles of 3mm white glass, the question here is how white glass will do covered with pieces of 3mm colored glass for the petals, and circle in the middle of the flower.   I will use the full fuse firing schedule as follows:

400dph...........................1225 degrees.......................hold 1 hour
600dph............................1470 degrees......................hold 10 mins
Full..................................900 degrees........................hold 1 hour
100dph.............................700 degrees.......................off

This is showing some artistry with the cutting of glass and use of the grinder as well as placement and design.  This also has 2 1/2 layers instead of 2 layers and I shall see if the thicker piece works the same.
Lessons Learned:

I like this better on thinner glass so I liked this better when I put a 2mm thin clear on top of a 3mm clear to make 5 mm worth of glass.  So next I will try using a piece of 4mm clear glass which I will cover with petals etc.  I did not like adding the additional yellow pieces .  also I like adding the center circular piece so it sits over the petals, so the center appears fully round and not cut off by the petal.  I wonder how it might work if I used a 4mm piece of glass, if I do think this I will have to account for it in the firing schedule.  Should I try a full process temperature of 1460, not 1470 degrees.

SMALL SCALLOP MOLD CONTINUED 2

I fired my panel first and now I am adding several pieces to it and will full fuse it again but try to keep it a lower processing temperature.  I am trying the following:

400dph...............................1225degrees..............................hold 1 hour
600dph................................1450degrees.............................hold 10 mins
Full.......................................900degrees..............................hold 1 hour
100dph..................................700degrees..............................0ff


Next small scallop mold project will combine bullseye 1140-0030 aventurine blue with bullseye 0126-0030


bullseye spring green opalescent kiln glass 000126-0030-x-xxxx


1140-0030I am using the spring green as the base with aventurine blue as the petals and an amber circle in center.  The overall base for the piece is clear.  I am currently firing it at full fuse as follows:

400dph...........................1225 degrees.......................1 hour
600dph...........................1470 degrees........................10 mins
Full...................................900 degrees..........................1 hour
100dph.............................700 degrees...........................off

Friday, July 10, 2015

SUN CATCHER

I definitely have ADHD or so I think, because I like to switch between at least 2 projects at one time.  This way I can let one glass project cool properly while working on the next or at least think about the next.  So here I am with a sun catcher.  I had remnants of an emerald green fractured irid glass which I used on the spiral pattern fuser.  The glass looks pretty and looks especially nice when slumped over the pattern fuser.  But I did not have enough to do another one of that so I turned it into a sun catcher instead.  I just fired two panels to be included in the suncatcher with the irid glass on top and clear glass as a base.  In order to create the two panels I fired the pieces using the panel firing schedule for a project listed on Coleur de Verre web site.  It seems to work quite well when fusing two pieces of 3mm glass together:

Panel Firing Schedule:

300 dph................................1250 degrees.................hold 30 mins
300 dph................................1420 degrees.................hold 10 mins
Full.........................................900 degrees.................hold 1 hour
100 dph...................................600 degrees.................off

Next I am creating 2 decorative pieces with clear base and am putting scraps of the emerald green fractured irid on top and tack fusing them, I hope, with this schedule:

Tack Fusing Schedule

400 dph...............................1000 degrees.....................hold 10 mins
600 dph................................1350 degrees.....................hold 5 mins
Full........................................900 degrees......................hold 1 hour
100 dph.................................700 degrees.......................off

So hopefully this firing schedule will leave some texture on the two clear pieces.  That is what I am hoping to achieve and latel I have not been able to and all my pieces full fuse.

Took a break and dont know whether or not I actually did this piece.  So instead I am working on a flower on a panel of transparent glass, one layer that can be hung outside or perhaps in a window.  Maybe I will get a chain to hang it with after drilling two holes or using bales.  And maybe next time I do this I can try curving the stringers first.


I am firing the above with following firing schedule:

400 dph............................1000 degrees................hold 10 mins
600 dph.............................1400 degrees................hold 5 mins
Full......................................900 degrees...............hold 1 hour
100 dph................................700 degrees...............-0-
off

The firing schedule worked.  It tack fused the flower to the base and did not distort the one layer of glass underneath.  I did wind up using and irid piece of glass with the irid side down and I also used yellow striker glass that turned warm orange.   All are mistakes that don't seem so bad.

 The color it turned is not so bad, warm orange.  I should really start noting the colors that I use.
The guy at the gift shop on main street in Damariscotta really liked the glass so I would like to get so more irid and make a couple more of those plates.

Fiber paper molds

I really like the glass artist who make their own molds and mold natural or found figures in glass, but from all of the reading that I am doing it appears that I am not quite ready to start making my own molds, I am not even ready to understand how it is done.  So for now I will work with other methods, using other people's molds, beautiful as many of them are and today I tried to create texture or a pattern in my glass with cut out shapes.

I had traced the leaves of flowers and cut them in fiber paper.  This paper may have already been used in a firing project but it cut easy enough with some crumbling of the paper.  I think I may have already fired something with this piece and that is why it so easily crumbled but then lets see what happens.  I put it together underneath  layers of glass and used the following firing schedule which I labeled as the schedule for the cherry blossom and Net leaf vein molds.  Lets see how that comes out.  It goes as follows:
300 dph.............................................1360 degrees........................hold 20 mins
300 dph.............................................1445 degrees........................hold 10 mins
Full......................................................900 degrees.......................hold 1 hour
100 dph..................................................700 degrees......................-0-

off
Well that works but I have also added a first step that I believe is a bubble squeeze which allows me to fuse two layers of glass over the fiber paper and also fire them together in one step.  And that seems to have worked  What I have determined is the finished piece is only as nice as the cut out fiber paper is and I do have to work at getting that better.  Finding better simpler drawings that use the space of the glass piece better.  I still think that this project can work.  See here the results of the first try, using cut out circles.  I need to place those elements in a more artistic matter and use something other that clear glass.  Maybe i can also fill them with frit.

In this example I overlapped the circles, maybe I could do more and space them differently.

So here is I tree I traced and then fired, not bad but not great.  Would it look better in a different color glass or if someone with artistic ability had traced the tree?  My next attempt is a celtic symbol which I am fusing into a 2 layered piece I fused years ago.  This piece has a third layer of fishes and other decorative pieces fused into it.  We will see how this effects the whole thing.

And finally what have I learned.   What comes out on the glass all has to do with  how good the fiber paper mold looks and also particularly how it is placed on the glass.  The next one I will try is going to be multiple shapes placed through out the glass.  I think I like more shape then less so basically fill the whole space like the spiral fuser I have from Coleur de Verre.  This is how my celtic symbol experiment came out.

And this is how I fired it:

300 dph..............................1250 degrees................hold 10 mins
300 dph..............................1445 degrees................hold 10 mins
Full.......................................900 degrees................hold 1 hour
100 dph.................................700 degrees................off

Again I wonder how this would look with different colored glass with a smaller pattern that is repeated; with a more realistic pattern etc..................... 


so this is more of what I want to do, wonderful blue glass and the leaves themselves are out so that the way to do that is to trace a leaf on tracing paper and cut it out.  Place paper below the glass and when glass melts it will do so into the space left from the cut out leaf.  So based on this beautiful piece which I did not do, I am going to try again.  Looking for a page of various leaves or what ever and trace them.
So, I am going to slump this fiber paper circles onto the scallop slump mold.
And see how it all comes out.  the question is whether I need to cut the curved top outer edges, out of the glass before putting it on the mold. And also to see if the slumping firing schedule I am using for the scallop mold works:

300 dph.............................1200 degrees...................hold 30 mins
300 dph..............................1225 degrees...................hold 1 hour
Full.....................................900 degrees.....................hold 1 hour
100 dph...............................700 degrees....................off


    Now lets see if this advances one more space or it stays above the last picture.  I did slump the circular piece and it looks like this now.

That came out beautifully.  i want to do a few more

Monday, June 8, 2015

Fiber blanket mold.


So i made a 6 1/4 by 6 1/4 inch panel of transparent blue and transparent aqua fractured irid and then, as is my wont, I placed it in the kiln over a loosely assembled fiber blanket propped up by kiln furniture and then set the following firing schedule:

300dph........................1220 degrees.......................hold 1 hour 15 mins
full.................................900 degrees......................hold 1 hour
100 dph..........................700 degrees......................off

Still hot in there, haven't taken it out yet, but I can see there are some bumpy issues on the bottom.  Next time will have to be sure to smooth out the bottom better and also work on a better shape or design for the blanket.

A lot of issues, misshapen and not in a good way.  There edge where I fused two pieces together was missing a chip and that seems to have been agravated by the full fuse

I cut this out of the fiber blanket and most of the petals are well shaped but not the bottom one.  I also raised the fiber blanket mold on some kiln furniture and used the same firing schedule as above.  Used a piece of glass that I had fused several years ago.


Saturday, June 6, 2015

SMALL SOAP DISH SLUMPER MOLD and small PETAL MOLDS


I have what I am pretty sure is a soap dish slump mold.  #There it is and I have tried to cut glass out the same shape but cannot do it or at least cannot do it yet.  Perhaps after some practice, but that wastes a lot of glass so I have decided to fill it with frit instead and see what comes of that.  Here are some previous examples, one using handmade frit and the other using frit and pieces of glass.


I like the one made with clear frit mixed with other colors and the frit is not fine, it is at least medium so I can see little balls in the "cast leaf".  Although the mold is in the shape of a leaf, it is also a soap dish so it is plenty deep and not a delicate cast glass piece.  But I am trying to make it that way and fired it as a thin cast piece using the following schedule:

300 dph......................................1375 - 1400 degrees.....................hold 10 mins
I used 1375 degrees processing temperature, because it is good to fire it low at least to begin with.
Full...............................................900 degrees.............................hold 30 mins
Off
I would like to do more castings and will work with the several molds that I have.  Bullseye makes a frit and glass that is especially good for casting.  It is in the 1800 number series.  I used Spruce Green medium frit 0184-002-F with some blue fine frit and some black opal fine frit 00100-000.   Lets see how this works out as a cast work and not as a slumped piece.
This is pretty but technically speaking I did not put enough glass in the green lines.  so there are some spaces and it is mixed with fine black frit which I added because I thought I could use it to outline the lines on the bottom of the soap dish.  I will have to look out for the fill weight and to smooth it out on the top surface.  This one is bumpy.  The spruce green was medium frit and that heats differently then the fine which heats and fills the space better.  So I want to use either all fine frit or all medium frit not the two placed on either side of each other.  Am going to try to make more frit.  Now that I have read that after making your own frit, and cleaning it with a rare earth marble, you should sift it and take perhaps the medium pieces on up and try and sift the bad black pieces of metal out.  I will do that with clear and mix it with some medium frit that I have and try that next.
I have learned not to guess at the amount of glass needed to fit a mold.  In my latest try after this one above I was reminded not to put additions too close to the side, edge, of the glass.  So the experiments go on.  The firing schedule did work

300 dph.........................................1445 degrees.....................hold 10 mins
off.

But mostly it worked for the fine casting frit that I used in the small flower mold I got from Slumpys. 
I also wanted to see how the combination of the clear frit I made along with the black dichroic frit I added worked. I dont think it worked so well.  Will mix the clear frit with something else in the future.  The blue petals looked nice and I might try to turn those into a sun catcher. 

Making more I will use the following schedule:

300 dph..................................................1420 degrees................hold 5 mins for fine frit; 10 mins for medium frit
 Full.........................................................900 degrees.................hold 1 hours
off


Next I will try to slump a piece of glass that I just made by doing a pot melt.


Sunday, May 31, 2015

USING BILLET IN THE PYRAMID POT MELT

This is beautiful green billet that I am melt in the pyramid pot melt.  I cut it a long time ago but I believed it weighed a little under 10 ounces, the amount I determined was necessary for the pyramid pot melt.  I placed the glass over the mold, not like you see in the picture, but instead I took 2 smaller pieces and placed them in the crevice of the mold and put the 3rd piece which was larger along side and on top of the others, hoping to minimize the glass falling outside of the mold.  Otherwise I used the firing schedule from Bullseye pyramid casting mold 8948 as follows.

200dph..........................................1225 degrees.....................................hold 2 hours for billet
600dph...........................................1525 degrees....................................hold 2 hours
Full...................................................900 degrees....................................hold 1 hour
6 degrees...........................................800 degrees....................................-0-
12 degrees.........................................700 degrees....................................-0-
off

The billet came out beautifully.  It did look good however, there were many rough spots on the side, the mold is ruined and I am thinking that perhaps it was because of the way I stacked the billet above the mold.  Bullseye suggests.
 to layer the billet like a triangle for smoother edges around the finished base.  I did not do this so my glass stuck and there were other problems.  So when I try again in the new mold I will have 10 ounces of billet and I will layer it like they showed me in this information sheet.

Continue here with how it came out, although I did not use the prescribed layering method.  Mention trying sand paper to get rid of kiln wash, getting scratches and trying to firepolish.  Although now  I read that you should only use firepolishing with a flat piece, since firepolishing comes in at slump temperatures and you dont want to change the shape of your piece or make it slump.  So I will continue to cold work the pieces as much as I can.  Here is the result .

Pretty, the glass from the billets looks beautiful except for those marks that are perhaps from kiln wash that wont come off.  Am soaking it in vinegar and water. 

Tuesday, May 12, 2015

SPIRAL PATTERN FUSER FROM COLOUR DE VERRE APRIL 2015

Myra asked for a plate made from the botanical pattern fuser but I am going to make her one from the Spiral pattern fuser.  Here it is.
Spiral Pattern FuserAnd I will be using the same schedule as I fused for the botanical pattern fuser.  Will fire the two pieces of 6 and 1/4 inch square glass, one being 6 and 2/8 square and the other being 6 and 3/8 square,  first following the panel fuse information from Colour de Verre; then I will fire the finished piece using the following schedule
100dph......................................300 degrees                       hold 30 mins
150 dph......................................1250 degrees....................hold 30 mins
150 dph......................................1330 degrees....................hold 5 mins
Full...............................................900 degrees....................hold 1 hour
100dph..........................................600 degrees...................0ff

That worked out but one of the spirals in the center which happened to be on the red glass in center did not fuse as deeply as the other spirals.  It is hardly noticeable but still, I will have to think about it.  Before it was bubbles and then I used less heat.  The guy from Coleur de verre said to use more glass and to use less heat.  Maybe is should try a little more heat on the next one and use only one kind of glass.  I already know that works best.   And finally transparent works better than opaque, but I should still be able to do this with opaque.
 THE LATEST TRY:
ON THE BOTANICAL PATTERN FUSER
I dont think it will be different on this one and my information confirms that,
 But now the question is weight and heat work.  This latest try is with amber transparent glass over clear glass.  It weighs 13.5 ounces and so I did not add any heat and left the processing temperature at 1330 degrees.
So this time I will try two piece of clear glass, again not the full fill weight, but I do not see any reason why it should not work anyway and I will fuse the pre fired panel of blank glass on the botanical pattern fuser at 1340 processing temperature:
10 degrees more heat could make a big difference and I do understand that different colors work differently but hopefully this should tell me what i need to do.
"Understanding that glasses have different viscosities – most often referred to as hard and soft – can help in the choice of colours and styles of glass to combine. Some glass will spread more, and also allow other glass to sink deeper into the layer than others. It might help avoid combining extremely hard and soft glasses next to each other.
It should also help explain some results that were not planned. It may help in when thinking about uneven slumps.
It is important to recognise that glass chemistry is extremely complicated, and to see that the expansion characteristics have to be balanced with the viscosity characteristics as the two main elements in compatibility. There are others, of course, but these appear to the two main ones."  Posted by Stephen Richard on his "Glass Tips" Blog

So here is the piece processed at 1340 degrees.  It is hard to see because it is clear but almost the whole left side, perhaps about 1/3 of the whole piece did not fuse all the details.  
So it this case it appears that less heat may have been better and maybe I should also try more glass.  So I have two prefired pieces to go and I think I will add a third piece to it, if there is enough space and 3 layered piece of glass and see how that works.

So I will try the next one back at less heat 1330 degrees but hold it longer 5 more minutes with 2 different smaller pieces of prefired glass, both 2 layers of glass and 1 piece of 3 layers that I want to use in bigger projects.  I want to see how the 3 layers of glass, one is thin 2mm glass, will do less heat and hold longer on the spiral pattern fuser.

The 3 layered piece came out relatively well; the 2 layered aqua blue had a large spot which did not pick up the spirals and the  irid piece came out the best.  I thought it might have something to do with the placement of the glass on the kiln shelf and maybe perhaps unlevelness.  So mark helped me make it more level and I will try a couple more pieces in it to test out that theory.  Here are the results of the first experiments.:

Notice the flat spot in the aqua spiral pattern.  This one was placed on the lower right hand side of the kiln.  I am hoping that the problem was that the kiln was not as level as it could be.  But I will try a couple more pieces on the pattern fuser and see if my supposition is correct.

Next experiment.  We have leveled the kiln shelf and for the test i placed the blue piece in the area where I thought I was having problems from the shelf not being as level as possible.

So the blue piece of glass, which was previously fired over another pattern mold was placed in the lower right hand side.  And I am also going to hold the processing temperature 5 minutes longer.  And so that step will look like this:
150 dph ......................................1330 degrees..........................hold 10 mins

So this seems to have helped, leveling the kiln as much as possible, although I feel that the floor moves and the levelness probably or may change often.  But for now it seems to have helped.  So I will try another 6 1/4 inch square on the spiral pattern fuser using glass that I bought from Stained Glass Express which the label said was Emerald, Cl Frac Irid    style BE11028A31F    That seems to be a number series in the Irid or frac line but I could not find it on the Bullseye web site.  Is that something that they no longer carry.  I will look on the Stained Glass express website and see if I could get more there.

slump onto 6 1/2 square slumper with following firing schedule:

300 dph...................................1200 degrees......................................hold 5 mins
Full............................................900 degrees......................................hold 1 hour
100 dph......................................700 degrees......................................-0-
Full...............................................70 degrees......................................off